 |
Augmented Network GEnerating Learning for Safety - Starter kit |
Help
Introduction
The ANGELS Administration panel permits you to completely configure a single hospital in real-time.
By using the administration panel, you will be able to manage departments, operators, tags and trainings.
If this is the first time using this panel, we recommend you to read carefully what is in this help page.
HOW-TO: Create a new department
- PRELIMINARY STEP: gather all necessary information
- make sure you have a .png file of the department map you want to use.
The file must not be very big, we suggest you use a map which is at most 1024x1024px.
Moreover, we suggest you to insert a "dark" image map, for better visualization results in the ANGELS Mobile Client.
Here is an example of a good map and a bad one:
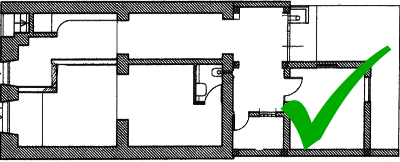
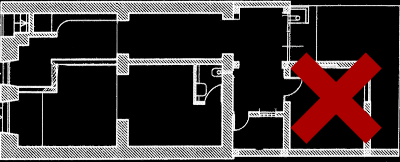
- make sure you know the dimensions of the map in meters. You will insert these values during the second step of the department creation.
- make sure you know the angle which the department has from the North. You will insert this value during the second step of the department creation.
- make sure you have a .png file of the department map you want to use.
The file must not be very big, we suggest you use a map which is at most 1024x1024px.
- Step 1: creating the Department
when creating the department, the first steps are inserting a name, description and the map image file.
IMPORTANT: once you have selected a map, you will not be able to modify it, so make sure the image file is correct. - Step 2: configuring the Department map
Once the necessary values are stored, you will access its main configuration panel. Click on the "Edit Map" link and you will access the Map configuration page.
Insert the "Length" and "Width" of the map.
Use the slider to adjust the angle which the map forms with the north. - Step 3: refining the configuration
Back in the Department configuration page, create the TAG by clicking on the relative button. - Step 4: adding TAGS
Click on the "Add TAG" button to create a new TAG for this department.
Please refer to the "TAGS" section to learn how to add a TAG to a department.
HOW-TO: Create a new Operator
- Step 1: create a user ID
Before start inserting data, make sure you have an unique code which will identify the new operator among others. This ID is also the one the operator can use to log into the ANGELS Mobile client. - Step 2: enter the operator data.
Enter the operator credentials, select one or more roles that he will have. - Step 3: enter a custom alert message
You can also enter a custom message which will be shown to the operator every time he/she will sign into the ANGELS Mobile client.
Operator Activities
Most of the operator's activities with the ANGELS Mobile client are registered in the system.
Each activity belongs to a particular action and can have an additional description:
- LOGIN: each time an operator logs into the system.
- LOGOUT: each time an operator signs out from the system.
- DEPARTMENTS REQUEST: each time an operator select the hospital.
This is useful if the operator has access to more than one hospital (see below how to handle this case).
For example, operators which may be able to access different hospitals are visitors or supervisors. - DEPARTMENT NAVIGATION: each time an operator select a specific department.
- TAG CONTENT DESCRIPTION: each time an operator sees a department TAG.
- TRAINING: each record will show the actual activity the operator made for a Training.
Handling operators in more than one hospital
If an operator must operate in more than one hospital which is in the ANGELS System, please contact the administrator.
What is a TAG
A TAG is a representation of a certain risk, prohibition, emergency or obligation which is related to a specific environment.
A TAG is inserted in a specific location inside a department and each operator responsible for it must attend and follow instructions on how to handle it.
HOW-TO Create a new TAG
- Step 1: adding basic information
Select a name, description, a department, category and critical level for the TAG.
IMPORTANT: please note that one you select a department, you cannot modify it anymore. - Step 2: creating the TAG Code
Once the necessary values are stored, you will access its main configuration panel. Click on the "Create Code" button to create the TAG identification code.
Once you have created it, you can print it. - Step 3: selecting which categories of Operators can interact with the TAG
At this point, no operators can interact with the TAG, so you need to select which roles are enabled to interact with it.
Just select one or more roles from the select list and then click the "Update" button. - Step 4: place the TAG int the department
At this point, the TAG has been located in the upper-left corner of the department. To adjust its position, just go in the department configuration page, then access the Map configuration page. You will then be able to drag any TAG on the map, updating its position in real-time. - Step 5: adding content
The last step is to add content to this specific TAG. Enter the TAG configuration page and you will be able to add text for its "Description", "Management Procedure", "Management Procedure Details", "Additional Notes" and "Additional contents".
HOW-TO Add additional content
For a single TAG, you can insert four types of additional contents: images, audio, video and 3D.
Inserting images
Images which have the following types can be successfully inserted:
- jpg
- png
Please also note that you need to also ensure that the size of the image does not exceed a certain size.
In fact, very big images could cause the ANGELS Mobile client to stop unexpectedly.
We suggest to insert images which are at most 1024x1024 pixel big.
Inserting videos
Videos which have the following type can be successfully inserted:
- 3gp
If you have a video file in another format, you can however convert it to this format and then you will be able to insert it.
Various video conversion software exists, like Super©.
Inserting audios
Videos which have the following type can be successfully inserted:
- mp3
- ogg
If you have an audio file in another format, you can however convert it to one of these formats and then you will be able to insert it.
Various audio conversion software exists, like Audacity.
We suggest you use mp3 files, since they are smaller with respect to ogg files, thus allowing a faster download by the ANGELS Mobile client.
Inserting 3D content
Videos which have the following type can be successfully inserted:
- fbx (compressed in zip format)
- md2
Fbx files must be first tested and then archived into a ZIP file by following a strict procedure. 3D content itself may also be pre-processed before being successfully displayed by the ANGELS Mobile client.
If you have 3D content to insert, we suggest you to contact us.
HOW-TO: Create a Training
- Step 1: creating the Training
Insert the name, description, start and end date of the training and select the department in which the training will take part. - Step 2: select which operators must attend the training.
In the training configuration page, select from the list of all the available operators, all the operators which must attend the training. - Step 3: add a step
Click on the "+" button to add a new step.
Select one or more TAGS from the list and add them to the new step. the TAGS will be displayed in a table.
For each TAG in the table, you can then configure a custom message and set if the TAG will be necessary to complete the step or not.
Additionally, you can also set a custom message for that particular step.
NOTE:
depending on the actual steps configuration you choose, you can create different types of trainings:
- Closed path: each step has only one necessary TAG.
- Open path: each step has more than one TAG. No TAGS are necessary to complete the step.
NOTE: this is practically the same as a free department navigation. - Semi-open path: each step can have one or more necessary TAGS and other optional TAGS.
For any questions and issues, please contact us at:
help@inglobetechnologies.com